|
Rock Textures from Scratch
This is simply a tutorial on one approach
to creating rock textures from scratch. The first step is to start out
with a 256x256 (or whatever res you want) image and use Filter | Render |
Clouds. This filter is handy because the resulting image can be tiled
without any seams:
Now, for a more detail, use the Difference Clouds filter (Filter | Render
| Difference Clouds). Repeat this many times. Just keep hitting
Ctrl-F.
In the channels tab, right click on one of the channels and select "Duplicate
Channel." Select the RGB channels, and fill them with a grey (select
a grey background color, then hit ctrl-a, then del).
The cloud effects will be used as a bumpmap for the rock. Some cool
effects can be achieved using the lighting effects: Filters | Render | Lighting
Effects...
Play around with it until
you get what you want. It's always a good idea to save your lighting
style once you've found one you like, because they're really hard to replicate.
:)
There are some really strong highlights and shadows in this one, which we
don't want (it makes the tiling really noticeable). This can be reduced
by copying and pasting the image into a new layer, making it about 50% transparent,
and offsetting it, or by repeating the procedure in a new image and pasting
that on top.
It needs some color now. Make a new channel and fill it with noise
(Filter | Noise | Add Noise). We'll use this channel for speckling
a variety of color on the rock. Blur it a little to soften the noise.
Create a new layer in the RGB channels and fill it with what you want to
use as the base color of the rock. I used brown, but you might want
to use more of a grey, depending on what kind of a rock texture you're trying
to create. Once you've done that, control-click on the channel you've
created -- the one with the noise. This will select based on the values
in that channel.
Set another color as your background color. I used a different shade
of brown. You might try experimenting with some pale greens for a mossy
look.
Now set that layer to hard light (or possibly soft light or multiply, depending on what looks best with what you've done).
At this point, it's just a matter of tinkering to adjust it the way you want
to, or you can just leave it at that. Before tinkering, it's best to
copy all of the layers merged into a new layer (Ctrl-A, Ctrl-Shift-C, Ctrl-V).
Then you can tinker with the brightness and whatnot.
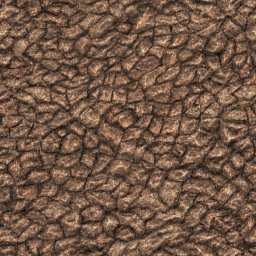
If you want to make more defined rocks or more of a stone-wallish look, throw
in another layer set to multiply and start defining some cracks/shadows with
the airbrush tool using a dark or black color. A drawing tablet can
be useful in this stage:
Highlight them as well with a color dodge layer (using a light color):
Note: Never work all the way to the edge of the image. Work in the middle, then offset all of the layers you're working with.
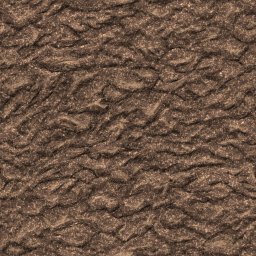
The first result of this technique...
It didn't come out as well as I had hoped, but that's what I get for trying
to put together tutorial images as I experiment. Here's one highlighted
a little differently:
Feel free to contact me about anything in this
tutorial that didn't make sense or could use improvement. Heck, you
can even just tell me about your pet wombat for all I care. I hardly
get any real (non-spam) email anymore.
|
|
|